 | Logarist |
Video Color Correction |
Introduction
Logarist brings color science to the art of color correction, enabling fast and accurate adjustment right inside your video editing application, without the need to shoot raw. Logarist reduces color correction to its fundamentals, with controls that work much like the controls built into a camera or a raw image processor like Lightroom. Logarist uses look-up tables (LUTs) to transform your camera's video into a color space optimized for exposure compensation, white balance correction, and contrast adjustment, and then renders it for view on standard displays. Logarist makes basic color correction easy and accurate, and enables advanced corrections that are otherwise difficult or impossible. Logarist is free, and you can download it from this web site.
Watch the Logarist intro videos on YouTube:
Supported Video Applications
- Premiere Pro
- Premiere Elements
- DaVinci Resolve
- Vegas Pro
- Final Cut Pro X
Supported Camera Color Spaces
- BT.709 (standard HD video)
- Arri Alexa Log C
- Canon EOS Neutral
- Canon Log 1–3
- Canon Wide DR gamma
- DJI D-Log, D-Gamut
- Fujifilm F-Log
- GoPro Protune
- JVC J-Log1
- LG-Cine Log
- Panasonic GH2 Standard
- Panasonic GH4 Cinelike D
- Panasonic GH4 V-Log L
- Panasonic GH5 Cinelike D*
- Panasonic VariCam V-Log
- Sony Cine1–2
- Sony HyperGamma 2, 4, 7, and 8
- Sony S-Log1–3
Download Logarist
Logarist for Adobe Premiere (Win)
Logarist for Adobe Premiere (Mac)
Logarist for DaVinci Resolve (Win)
Logarist for DaVinci Resolve (Mac)
Logarist for Final Cut Pro X
Logarist for Vegas Pro
Version History
- 1.13.0: improved color volume mapping to BT.709 for bright saturated colors
- 1.12.0: added LG-Cine Log (LG V30)
- 1.11.0: added DJI D-Log, D-Gamut; added Canon C200 Canon Log MP4; fixed a level mapping bug for Arri Alexa Log C
- 1.8.0: added Canon Wide DR gamma
- 1.7.0: added Sony HyperGamma 7 and 8
- 1.6.0: added Arri Alexa Log C
- 1.5.0: support for Premiere Pro and Premiere Elements (Windows and Mac) with a new Logarist plugin
- 1.4.0: added support for Premiere Pro and Premiere Elements in Windows
- 1.3.0: fixed a level mapping bug for V-Log L and V-Log in FCPX; reduced the number of points in FCPX, to reduce loading times and fix out-of-memory conditions in mLUT Plugin; added compensation for internally recorded Canon C300mk2 firmware version 1.0.6 full_range_flag files in FCPX
- 1.2.0: fixed a level mapping bug for Sony S-Log1/2/3 in DaVinci Resolve; added Panasonic GH4 V-Log L external for Mac
- 1.1.0: added Fujifilm F-Log
- 1.0.0: Initial release
中国用户
下载
中文说明
中文视频
BBS 论坛贴
Discussion Topics
Logarist at personal-view.com
Logarist at dvxuser.com
Logarist for Vegas Pro at vegascreativesoftware.info
How Logarist Works
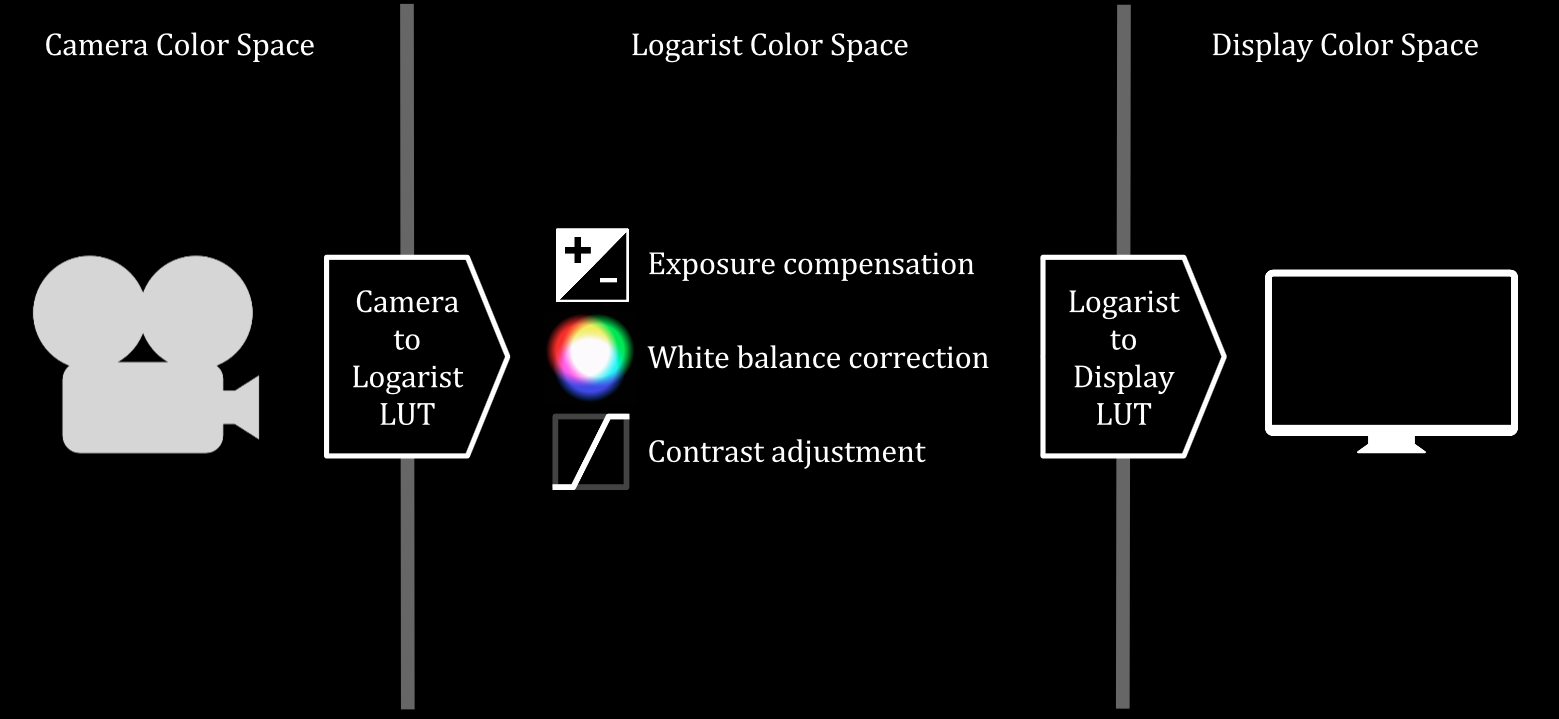
Logarist uses look-up tables, or LUTs, to transform between color spaces. Logarist LUTs are always used in pairs. The first LUT transforms from your camera's color space into the Logarist color space. The second LUT transforms into the display color space. Color correction is performed in the Logarist color space, between the two LUTs.
Display Rendering and Highlight Compression in Logarist
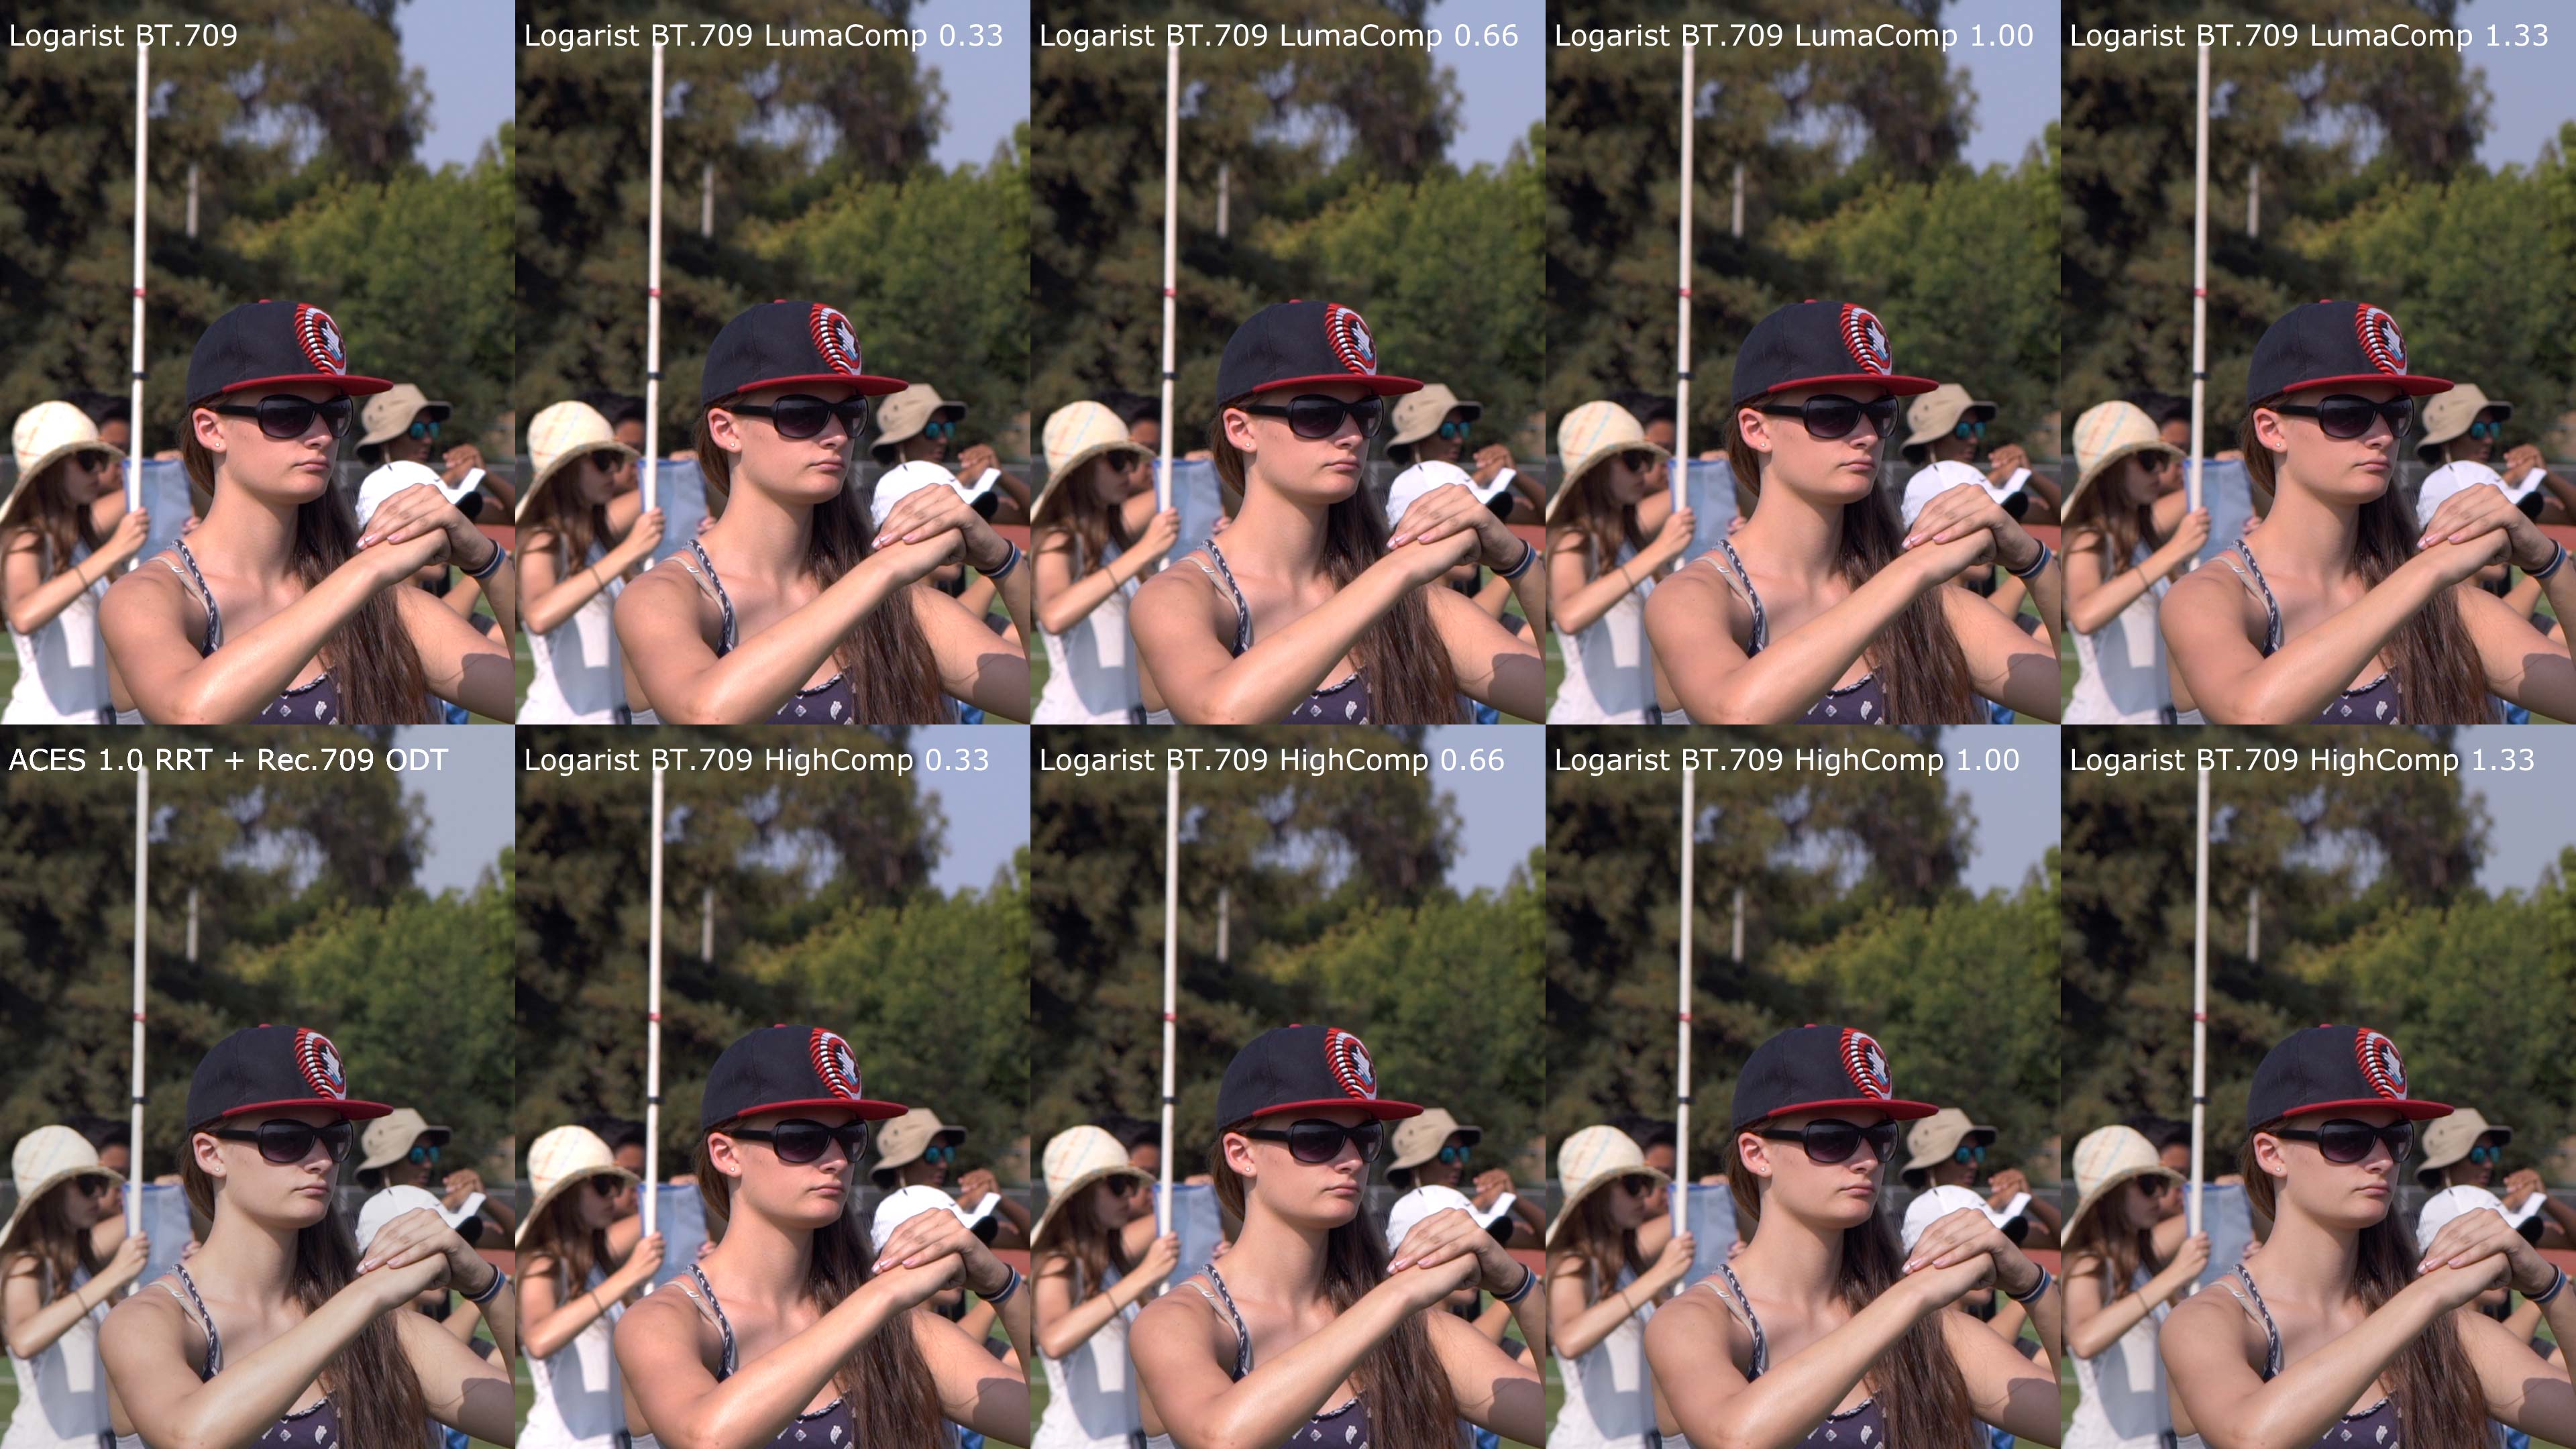
Logarist renders images for standard computer monitors, mobile displays, and TVs using Recommendation ITU-R BT.709 (sometimes called Rec.709). BT.709 renders images with normal contrast across its dynamic range. But standard monitors are not very bright, so BT.709 is unable to reproduce very bright highlights, even if your camera is capable of recording them. Bright highlights may be clipped in BT.709, with a harsh and unnatural appearance. Logarist extends the highlight range of BT.709 with several optional highlight compression curves: (ACES is also shown, for comparison)
LumaComp compresses highlights using a curve applied to the Luminance (CIE 1931) channel before transformation to BT.709. This preserves saturation and hues. I typically use LumaComp 0.66 on my videos.
HighComp is a film-like highlight compression curve that reduces saturation in the highlights.
The number refers to the amount of highlight extension, measured in stops - from 1/3 stop to 1 and 1/3 stops.
These highlight compression curves are provided as an optional convenience to the user. You may instead wish to use standard BT.709 with no curve, or with a curve that you define yourself in your video editing application.
Video Application Instructions
Premiere Pro
Logarist has been tested in Premiere Pro CC 2015, CC 2017, and CC 2018. Earlier CC versions, CS5.5, and CS6 should also work. On Macs, macOS 10.9 or later is required.
Download the Logarist package (above) and install it. Restart Premiere Pro to load the new plugin.
- Open a project and switch to the Effects workspace.
- Click on a video clip in the timeline to select it.
- From the Effects panel, Video Effects, Color Correction, drag the Logarist effect onto the video clip in the timeline.
- In the Effect Controls panel, click the Logarist effect's setup button:

- Under Input LUT, click Open..., browse to a camera-to-Logarist LUT file, and then click Open.
- In the Effect Controls panel, click the Logarist effect's setup button:
- Under Output LUT, click Open..., browse to a Logarist-to-BT.709 LUT file, and then click Open. I usually choose BT.709 LumaComp 0.66.
- Perform color correction:
- Adjust the Exposure, Red, Green, Blue, and Contrast parameters by dragging a slider left or right, or by clicking on a number and dragging it up or down. Dragging a number gives a wider range of adjustments.
Premiere Pro Tips:
- You can save the Logarist effect with LUTs and adjustments as a preset so it can be quickly applied to more clips:
- In the Effect Controls panel, right click on the Logarist effect and then click Save Preset.
- Give the preset a name and click OK.
- To apply the preset to a new video clip, find it under Presets in the Effects panel and drag it onto the video clip in the timeline.
- Speed up video playback and adjustment responsiveness by setting the Program Monitor Playback Resolution to 1/2 or 1/4.
- When you're not doing color correction, you can mute all effects to speed up video playback. (CC 2017 and later)
- In the Program Monitor panel, click the Button Editor button (plus icon).
- Drag the Global FX Mute button ("fx" icon) onto the Program Monitor's button bar, and click OK.
- Now you can toggle all effects on and off by clicking the Global FX Mute button in your Program Monitor panel.
Premiere Elements
Windows users: Logarist has been tested in Premiere Elements 15. 64-bit builds of earlier version of Premiere Elements should also work. If you have a 32-bit build of Premiere Elements installed, you can download a 64-bit build of the same version and install it using your serial number.
Mac users: Logarist requires Premiere Elements 11 or later and macOS 10.9 or later.
Download the Logarist package (above) and install it. Restart Premiere Elements to load the new plugin.
- Open a project and switch to the Expert view.
- Click on a video clip in the timeline to select it.
- Click Effects (the second "fx" button, without a pencil)
- In the Effects panel, under Video, click the pull-down and select Color Correction.
- Drag Logarist from the Effects panel onto your video clip in the timeline.
- In the Applied Effects panel, click the Logarist effect's setup button (gear icon).
- Under Input LUT, click Open..., browse to a camera-to-Logarist LUT file, and then click Open.
- In the Applied Effects panel, click the Logarist effect's setup button (gear icon).
- Under Output LUT, click Open..., browse to a Logarist-to-BT.709 LUT file, and then click Open. I usually choose BT.709 LumaComp 0.66.
- Now you can perform color correction:
- Adjust the Exposure, Red, Green, Blue, and Contrast parameters.
- For coarse adjustments, drag the sliders right or left.
- For fine adjustments, drag the numbers up or down.
Premiere Elements Tips:
- You can save the Logarist effect with LUTs and adjustments as a preset so it can be quickly applied to more clips:
- In the Applied Effects panel, right click on the Logarist effect and then click Save Preset.
- Give the preset a name and click OK.
- To apply the preset to a new video clip, find it under My Presets in the Effects panel and drag it onto the video clip in the timeline.
DaVinci Resolve
Download the Logarist package (above) and install it according to the instructions in the readme file.
- Set up your project:
- In Color Management or Main Project Settings: set Color science to DaVinci YRGB.
- In Color Management: set "3D Lookup Table Interpolation" to Tetrahedral.
- In General Options or Color: uncheck "Use Legacy Log grading ranges and curve".
- In General Options or Color: uncheck "Use S-curve for Contrast".
- Configure clip properties:
- In the Media or Edit workspace, select all of the clips that you want to use with Logarist, right click, click Clip Attributes, and set Data Levels to Video. The Logarist LUTs all expect the video files to be decoded to video levels.
- Color correct:
- Set a camera-to-Logarist LUT: right click on the clip, click 3D LUT, and then set the camera-to-Logarist LUT that corresponds to the color space of the clip.
- Set an output LUT: in the Color workspace, right click on a corrector node, and set the 3D LUT to one of the Logarist-to-BT.709 LUTs.
- Working in that corrector node, you can do basic color correction with Color Wheels set to Log mode:
- Exposure compensation: drag the Offset master wheel left or right.
- White balance correction: adjust the Offset color balance control.
- Contrast adjustment: set the pivot to 0.5 and then adjust the contrast.
Color Correction Tips:
- You can do more advanced corrections by breaking things into separate corrector nodes: Create three or more corrector nodes in series. Put a Logarist-to-BT.709 LUT on the last node, basic corrections on the first node, and selective corrections on nodes in between.
Vegas Pro
Logarist supports Vegas Pro 15 using the included VEGAS LUT Filter. The VEGAS LUT Filter included with builds 311 and later is GPU accelerated, providing a significant speed-up for the Logarist workflow when you enable GPU acceleration in video preferences.
Logarist supports Vegas Pro 13 and later using the €2.49 VisionColor LUT Plugin. Restart Vegas Pro after installing the plugin.
Note: the Vegas Pro 15 LUT Filter can be used in Vegas Pro 13 or 14 by copying "C:\Program Files\VEGAS\VEGAS Pro 15.0\OFX Video Plug-Ins\Vfx1.ofx.bundle" to "C:\Program Files\Common Files\OFX\Plugins\Vfx1.ofx.bundle".
Download the Logarist package (above) and install it according to the instructions in the readme file.
- In Project Properties:
- Set the Pixel format to 32-bit floating point (full range).
- Set the Compositing gamma to Video.
- Set the View transform to Off.
- Add Event FX to your video event in this order:
- VEGAS LUT Filter or VisionColor LUT Plugin
- Channel Blend
- Brightness and Contrast
- VEGAS LUT Filter or VisionColor LUT Plugin
- In the first LUT effect, load a camera-to-Logarist LUT file.
- In the second LUT effect, load a Logarist-to-BT.709 LUT file.
- Perform color correction:
- Exposure compensation: in the Brightness and Contrast filter, drag the brightness slider. Hold down Ctrl to make fine adjustments.
- White balance correction: in the Channel Blend filter, adjust the Red, Green, and Blue offsets in the last column. Hold down Ctrl, click between the up and down arrows, and drag up or down to make fine adjustments.
- Contrast adjustment: in the Brightness and Contrast filter, drag the contrast slider. Hold down Ctrl to make fine adjustments.
Final Cut Pro X
Download the Logarist package (above) and unzip it to a location of your choice. Logarist LUTs are loaded using the mLut Plugin by motionVFX. Logarist will not work correctly with other LUT plugins. The mLut Plugin is free. To download the plugin from the mLut Plugin page, click GET NOW to add it to your cart, click the cart button, sign up for an account with motionVFX, complete the checkout process, and install the plugin using mInstaller and your motionVFX account. Restart Final Cut Pro X after installing the mLut Plugin.
- For clips recorded in Canon Log 1–3, S-Log2/3, VariCam V-Log, or Alexa Log C, make sure Final Cut Pro's built-in log processing is turned off.
- Use the Effects Browser to add effects to your video clip in this order:
- mLut by motionVFX
- Color Correction
- mLut by motionVFX
- Click the clip to select it, and open the Inspector.
- In the first mLut effect:
- Uncheck HUE/SATURATION.
- Click Load Custom LUT, and browse to a camera-to-Logarist LUT file.
- Note the end of the LUT filename and whether it says [Highlights 1.1]. Click Load.
- If the filename ended in [Highlights 1.1], click on the Highlights value, type 1.1, and hit Return.
- In the second mLut effect:
- Uncheck HUE/SATURATION.
- Click Load Custom LUT, browse to a Logarist-to-BT.709 LUT file, and click Load.
- Perform color correction:
- In the Color Correction effect, click to open the Color Board.
- Click Exposure, and then adjust the Global Exposure. You can drag the global control on the left, or click the percentage and use the up and down arrow keys to make fine adjustments.
- Click Color, and then adjust the Global Color. The hue angle can be quickly changed by dragging the angle value up or down. The percentage can be adjusted by clicking on the value and then using the up and down arrow keys.
- Use the Contrast slider in the second mLut effect to adjust the contrast.
To make finer color adjustments:
- Follow the above instructions, but use two Color Correction effects between the mLut effects instead of one.
- In the first Color Correction effect, set Exposure Shadows to -100.
- In the second Color Correction effect, set Exposure Shadows to 50.
- Now color correction can be performed on the first Color Correction effect according to the above instructions. Exposure and color corrections will be twice as fine, meaning each percentage would need to be doubled to achieve the same effect.
Camera Instructions
Standard HD Cameras
If your camera doesn't record to one of the color spaces explicitly supported by Logarist, it probably records to something that is similar to BT.709. For these cameras you can use a BT.709 to Logarist input transform. This will allow you
to perform basic color correction, though it won't be as accurate as if
you were using a supported camera color space. The Logarist BT.709
input transform can't undo the non-standard effects of your camera's
color processing. The larger the color corrections you make, the
greater the color errors will be, as the differences between your
camera's output and BT.709 will be amplified.
If your camera has a knee setting, disable it if possible, or set the knee parameters as high as they will go.
In Vegas Pro and in DaVinci Resolve for Windows, two different BT.709 input transforms are available:
- BT.709 video_levels to Logarist
- BT.709 full_range to Logarist
Which transform you should use depends on your camera and its recording format. You need to test to find out. Shoot an all-black test video with the lens cap on. Bring that video recording into your video application, and apply the BT.709 full_range to Logarist LUT and then the Logarist to BT.709 LUT. In Resolve, you'll also need to set the Clip Attributes Data Levels to Video. (All Logarist input transforms expect this.) Check your scopes. If the scopes show the camera's black at 0%, your camera uses full_range encoding. If the scopes show black at 6%, your camera uses video_levels encoding.
- Cameras with video_levels encoding: virtually all cinema cameras and professional camcorders, AVCHD cameras, Sony cameras
- Cameras with full_range encoding: Canon EOS DSLRs, Apple devices
Logarist's BT.709 input transforms support RGB values above 100% (superwhites). Values below 0% are supported also, consistent with the xvYCC standard.
Arri Alexa
Logarist supports the Log C color space of the Arri Alexa (SUP 3.0 or later) and Arri Amira. Logarist comes with input transforms for Log C with the camera's Exposure Index set to 800 or 1600. Contact me for input transforms for other Exposure Index settings.
Canon Cinema EOS
Different C-series cameras support different color spaces. Refer to this table and make sure you select the Logarist input transform that corresponds to the color space generated by your camera:
| Logarist input transform |
C100, C100-II, C300 |
C500 |
C300-II, C700 |
C200 |
| Canon Log (daylight or tungsten)a |
● |
c |
● |
● |
| Canon Log, BT.709 Gamut |
|
d |
● |
● |
| Canon Log, DCI-P3 Gamut |
|
|
● |
|
| Canon Log, DCI-P3+ Gamut |
|
d |
|
|
| Canon Log, BT.2020 Gamut |
|
d |
● |
|
| Canon Log, Cinema Gamut |
|
d |
● |
|
| Canon Log 2/3, BT.709 Gamut |
|
|
● |
f |
| Canon Log 2/3, DCI-P3 Gamut |
|
|
● |
|
| Canon Log 2/3, BT.2020 Gamut |
|
|
● |
|
| Canon Log 2/3, Cinema Gamut |
|
|
● |
|
| Wide DR gamma, BT.709 Gamut, Neutral matrixb |
● |
e |
● |
● |
| Wide DR gamma, BT.2020 Gamut, Neutral matrixb |
|
e |
● |
|
Input transforms assume a Neutral color matrix, unless otherwise specified.
- Canon Log gamma with the Cinema EOS Original or Canon Log color matrix
This corresponds to the Canon Log or Cinema preset on all cameras.
- Wide DR gamma with the Neutral color matrix
These correspond to the BT.709 and BT.2020 presets.
Logarist does not support the Wide DR color matrix or Wide DR preset.
- C500 MXF recordings and HD-SDI terminal
- C500 3G-SDI and monitor terminals (LUT disabled)
- C500 HD-SDI and monitor terminals with a Wide DR LUT enabled
- Canon Log 3 only
|
C200 users with DaVinci Resolve (Mac) or Premiere (Mac & Win): for internal MP4 recordings in Canon Log or Canon Log 3, choose the MP4 version of the Logarist input transform. In Premiere, Logarist compensates for the fact that Premiere uses an incorrect BT.601 YCbCr to RGB matrix to decode these files instead of the proper BT.709 matrix.
C200 users with Final Cut Pro X: for internal MP4 recordings in Canon Log or Canon Log 3, choose the full_range_flag version of the Logarist input transform.
C300mk2 users with Final Cut Pro X: for internal XF-AVC recordings in Canon Log 1–3 made with firmware version 1.0.6 (released December 2016) or later, choose the full_range_flag version of the Logarist input transform.
Starting with Canon C300mk2 firmware version 1.0.6, the camera improperly sets the video_full_range_flag in the VUI section of internal XF-AVC recordings. The C200's internal MP4 recordings have the same problem. Logarist compensates for these bugs.
Canon EOS DSLRs and EOS M
Logarist provides an input transform for H.264 .MOV and .MP4 videos in the EOS Neutral picture style. The camera should be set as follows:
- Contrast: 0
- Shadow: 0
- Highlight: 0
- Color Tone: 0
- Color Saturation: 0
- Using full-frame EOS DSLRs: set the ISO to a power of two times 100: 100, 200, 400, 800, 1600, 3200, etc.
- Using APS-C EOS DSLRs: set the ISO to a power of two times 200: 200, 400, 800, 1600, 3200, etc.
- Using EOS M mirrorless cameras: any ISO setting 100 or higher can be used.
If you don't use the above settings, the camera's color space won't match what the Logarist transform is expecting, and colors will be transformed incorrectly. If using DaVinci Resolve, make sure that each clip's Clip Attributes has Data Levels set to Video. (All Logarist LUTs expect this.) Add your camera's video file directly to the timeline, without any prior conversion, as conversion might alter the levels. MJPEG files (e.g. from the 1D C, 1D X Mark II, and the 5D Mark IV) have not been tested: I'm not certain that Logarist will map levels correctly for those videos.
DJI
Logarist supports the DJI Cinema Color System D-Log, D-Gamut color space introduced with the Zenmuse X7. This is not the same as the D-Log color space of earlier cameras. For earlier cameras such as the Mavic Pro, I recommend setting the color mode to something standard and neutral such as None or TrueColor, and then using the Logarist BT.709 input transform.
GoPro
Logarist supports GoPro cameras with Protune when set as follows:
- Color mode: Flat
- White balance: Auto, or a Kelvin value (not CAM RAW or Native)
Panasonic GH2
Logarist provides an input transform for the GH2's Standard film mode. The film mode must be set as follows:
- Contrast: 0
- Saturation: 0
If using DaVinci Resolve with AVCHD .MTS files, make sure that the clip attributes data range is set to Video,
because Resolve will likely guess wrong if set to Auto.
Panasonic GH4
Logarist is able to invert the color processing of Cinelike D on the GH4, correcting the unnatural appearance of this photo style and making it the best choice for the GH4 in Logarist. To match what the Logarist input transform is expecting, the camera must be set as follows:
- Contrast: 0
- Saturation: 0
- Hue: 0
- Highlight shadow: standard
- i.Dynamic: off
- Master pedestal level: 0
Logarist also has a GH4 V-Log L input transform. I recommend V-Log L only when recording externally with 10-bit precision. V-Log L has very poor color precision in 8 bits. In Premiere, Final Cut Pro X, and DaVinci Resolve (Mac), there are two different V-Log L transforms: one for internal recordings, and one for external recordings. Make sure to choose the correct one. (No such distinction is necessary in the other video applications)
Note that the GH4 V-Log L transform is not the same as the VariCam V-Log transform.
Panasonic GH5
I have evaluated test footage from the Panasonic GH5, and so far it seems that the GH5's Cinelike D color space closely matches Cinelike D on the GH4. Therefore my recommendation for GH5 shooters is the same as for GH4 shooters: shoot in Cinelike D, and then use the Logarist GH4 Cinelike D input transform to process the footage. Refer to the GH4 instructions above for how to set the camera. I found that the GH5's Cinelike D footage processed this way had pleasing color, looking much better than any of the GH5's built-in photo styles. Good results may be obtained shooting with 8-bit or 10-bit precision. Cinelike D has good color precision in 8 bits, so you may opt to record internally in 8-bit 4k/60p.
At this point I cannot recommend shooting in V-Log L. I would need to conduct a more detailed analysis of V-Log L on the GH5 to determine what differences it has with V-Log L from the GH4 and whether Panasonic corrected any of its faults. My GH4 V-Log L transform compensates for those faults, and different compensation may be necessary for the GH5. I do not know if V-Log L holds any potential benefits over Cinelike D on the GH5. (It didn't on the GH4.)
Sony
On all Sony cameras that support it, I recommend customizing the picture profile with a Gamma setting of Cine1 or Cine2 and a Color Mode setting of Still. Set all other contrast and color settings to their defaults (Off, 0, or Auto). That includes black level, black gamma, knee, saturation, color phase, and color depth. Compared to S-Log2 and S-Log3, Cine1 and and Cine2 have:
- Easier shooting: you can judge exposure and white balance without a monitor LUT
- Higher color precision (less 8-bit banding)
- Better color accuracy than S-Gamut (on some cameras)
- Increased highlight range, due to Cine1 & Cine2 being available at much lower ISO settings (on some cameras)
Cine1 and Cine2 are available in Sony Alpha cameras since the a7S, the RX100 Mark IV, and the RX10 Mark II.
The only difference between Cine1 and Cine2 is how output levels are utilized. Cine1 uses an RGB range of 3% to 109%, whereas Cine2 uses an RGB range of 3% to 100%. Using Cine1, for example, if zebras are set to 100, there's about one stop of additional highlight range between 100% and 109% when zebras start to show. Using Cine2 with zebras set to 100, it's already clipping when zebras start to show.
Different color mode settings render colors differently. I find Still to be the most accurate, followed by Pro. S-Gamut3.Cine can also be used with Cine1 and Cine2, though in 8-bit recordings it will increase banding somewhat compared to standard color modes. S-Gamut3 should not be used in 8-bit recordings because it will cause excessive banding. I recommend against S-Gamut, which seems to have color accuracy problems, at least on the a7S.
Note that Sony Cinematone is not the same as Cine1 or 2. On cameras with Cinematone, use ITU-709 or Standard gamma & color instead, with knee disabled or set as high as it will go. Then use the BT.709 to Logarist input transform for color correction.
Sony XDCAM and CineAlta
Logarist supports several HyperGamma curves. To use a HyperGamma curve with Logarist, set your camera as follows:
- Turn off Cine EI mode.
- Set the gamma to HyperGamma 2, 4, 7, or 8.
- Set the color matrix to Standard.
- Set all other contrast and color settings to their defaults (Off, 0, or Auto). That includes black correction, step gamma, master gamma, black gamma, black level, knee, white clip, offset white, multi matrix, color phase, color depth, and saturation.
Logarist also supports S-Log, S-Log2, and S-Log3, each with a standard (BT.709) gamut or with S-Gamut (S-Gamut3 and S-Gamut3.Cine for S-Log3). I recommend testing different matrix and gamut settings to see how color accuracy compares, being particularly wary of S-Gamut.
On the PMW-F3, I recommend setting Dual-Link & Gamma Select to Video, and customizing the picture profile with matrix set to Standard, and gamma set to Cine1 or S-Log. When Dual-Link & Gamma Select is set to S-Log, the output is in a non-standard gamut that I haven't profiled.
Raw Images in DaVinci Resolve
Even if you shoot in raw, Logarist enables advanced color correction beyond what Resolve provides natively for raw decoding, like graduated filters and keyframed corrections. In Camera Raw Codec Settings for your video clip, set the Color Space and Gamma to Rec.709. Then apply the BT.709 video_levels to Logarist 3D LUT to the video clip. The Logarist BT.709 input transform reads RGB color values up to 130%, so reduce the raw exposure as necessary to keep the BT.709 RGB values below 130% before the Logarist input transform is applied, and then compensate in Logarist. You might be thinking that picture information would be lost by developing the raw image into the narrow-gamut small-dynamic-range BT.709 color space. That would be true if you were rendering to an 8-bit or 10-bit BT.709 video file. But in this case, there is no intermediate video file: Resolve keeps all of the color values in 32-bit floating point, which means no picture information is lost. Even out-of-gamut colors are preserved, because Logarist decodes them from negative RGB values.
Logarist Compared to ACES
Logarist and ACES are built around some of the same ideas: a common working color space, input transforms, and output transforms. But Logarist and ACES have different goals and different approaches. ACES aims to standardize the interchange and archiving of film and video material for motion picture production. Logarist aims to make color correction easier in popular video editing applications. There are other differences:
- In most applications that support ACES, everything is done in the ACES color space: all input material must be transformed into ACES, compositing and filtering are done in ACES, and sometimes even scopes show levels in ACES. Logarist is more flexible: you can mix uncorrected video with Logarist-corrected video, you can composite and filter in the color space of your choice, and scopes show your final output.
- Logarist supports more camera color spaces. I've built input transforms for most of the camera color spaces I could find specifications for, and I reverse engineered the color pipelines of additional cameras to build input transforms for them.
- The ACES Reference Rendering Transform has a distinct look that I think isn't very natural. The RRT has an extreme shoulder that extends down towards the midtones, reducing saturation and shifting skin tones towards green. Of course ACES doesn't dictate use of the RRT, but they provide no standard BT.709 transform that doesn't include the RRT. Logarist provides a standard BT.709 output transform, along with several types of highlight compression.
- The ACES gamut is very wide, and includes every color. The Logarist gamut is somewhat smaller, optimized to minimize hue shifts during contrast adjustment.
- ACES provides output transforms for several types of displays, including cinema projectors and HDR monitors. At this point, Logarist only supports standard computer monitors and HDTVs.
Logarist Color Space Specification
Logarist is a wide-gamut, high dynamic range, scene-referred tri-stimulus RGB working color space with a uniformly logarithmic opto-electronic transfer function, optimized for 32-bit floating point color correction in video applications.
- Primary chromaticities: (same as ProPhoto RGB)
- Red: x=0.7347, y=0.2653
- Green: x=0.1596, y=0.8404
- Blue: x=0.0366, y=0.0001
- White point: x=0.3457, y=0.3585 (D50)
- OETF: logarithmic, with middle grey at 0.5 and 0.069 units per base-2 stop.
- Logarist maps middle grey to 38.4% in BT.709.